This guide outlines the essential steps for installing Roboteq drivers in ROS, enabling motor operation via keyboard and simple commands, and accessing fundamental parameters like voltage and speed. We utilized Ubuntu 20.04 and ROS Noetic for this tutorial.
Creating the Catkin Workspace
To begin, it's necessary to establish a catkin workspace. This workspace is a directory designated for installing, modifying, and building packages required for ROS project development. The Roboteq package will be installed within this catkin workspace.
To create the workspace:
Open a terminal in Linux using the shortcut Ctrl + Alt + T.
Upon opening a new terminal, it's crucial to source the ROS environment to ensure the ROS commands function correctly.
please type:
source /opt/ros/noetic/setup.bashNow let's create our workspace
please type:
mkdir -p ~/catkin_ws/src
We see that we have created our workspace " catkin_ws" and the folder "src". All the folders from our packages will be installed in src folder.
Go to catkin_ws folder and compile the package
cd ~/catkin_ws
catkin_make
In our workspace we have to see that some new folders have been created as well as the CMakeList file in our src folder.

If when the catkin_make command is executed and an error like the bellow is shown:
" could not find a required component .... The following CMAKE erro indicates hat you either need to instal the package with the same name ...
serial_config.cmake
serial_config.cmake "
please install the roscpp and serial packages
sudo apt-get install ros_noetic_roscpp
sudo apt-get install ros_noetic_serial
Install Roboteq's drivers
Go to src folder and clone theRoboteq's repository from the github. Please type:
cd src
git clone https://github.com/Roboteq-Inc/ROS-Driver.git
The package " roboteq_motor_controller_driver" is the package that includes all the appropriate files so that to control our Roboteq's controller.

complile the workspace again and also source the workspace . This is very important step so that the ROS will always get the latest changes done in our workspace.
cd .. catkin_make source devel/setup.bash
Run Roboteq motor controller driver node
Having connected our controller in our system execute the roslaunch command so that to run the node ( ROS program) for Roboteq's controller.
roslaunch roboteq_motor_controller_driver driver.launch
The "roboteq_motor_controller_driver" is our package and the driver.launch is the file that execute our program "roboteq_motor_controller_driver_node.cpp"
In case that we have " unable to open port error " such as the below :

We have to give persmission on our serial ports, please kill the previous process (ctrl + c) and execute :
sudo chmod 666 /dev/ttyACM0
execute again the :
roslaunch roboteq_motor_controller_driver driver.launch
now you can see that our node runs normally.

Please open a new terminal, source the ROS environment so that ROS command to work ( when a new terminal is opened we have to source the ROS environment, we can change the bash file so that this process to be done automatically, we will give more details at the end of this article) .
please type:
source /opt/ros/noetic/setup.bashwe can see all the nodes( programs) that runs executing the rosnode list command, so that to confirm that our driver is running normally
rosnode list

executing the rosnode info command for a specific node we can see more information about the topics and the services that this node uses.
rosnode info /roboteq_motor_controller_driver

For our example, we can see that the roboteq_motor_controller_drives publish messages using the /battery_amps, /fault_flag etc topics. Also it subcribes messages to the /cmd_vel topic that is used to move the motors in both channels.
Run the motors
We will run the motors in both channels using the cmd_vel topic and the teleop_twist_keyboard.py node.
Open a new terminal and execute the:
rosrun teleop_twist_keyboard teleop_twist_keyboard.py
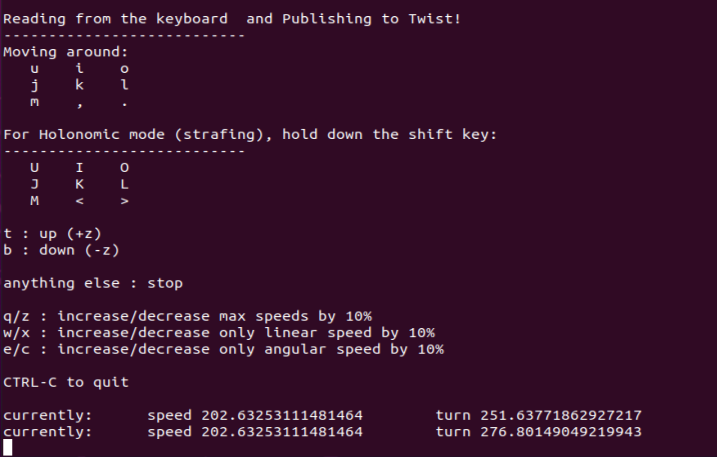
In seperate mode:
Using the w/x : we increase/decrease the speed in channel 1
Using the e/c: we increase/decrease the speed in channel 2
In mixed mode:
Using the w/x : we increase/decrease the speed in channel 1 (linear speed)
Using the e/c: we increase/decrease the speed in channel 2 ( angular speed for the steering)
Read Parameters
Open a new terminal and type the command:
rostopic list
so that to see all the parameters that we can monitor using the appropriate topics.

to monitor a parameter source the our workspace environment
source devel/setup.bash
and execute the command:
rostopic echo '/{parameter}'for example if we want to monitor the hall speed we can execute the command
rostopic echo '/hall_speed'

we can change or add more parameters to be monitored. For this action we have to go to query.yaml file and to write the appropriate command as are described in controlles manual.

Connect two or more Roboteq controllers
To integrate multiple controllers into the same ROS system using a single package, modifications are required. The goal is to establish separate nodes for each controller within the same package, specifically utilizing the Roboteq driver.
First of all, we have to detect which serial port each controller uses, so in terminal please type the command:
dmesg | grep tty
We see that the controllers in our system in this example, are connected to ACM0 and ACM1 serial ports
correspondingly.

We have to create an additional .yaml file for the second controller. Please go to the config folder and make a copy of query.yaml file. In the new file query2.yaml please change the port so that to be the corresponding port that the second controller uses.

Subsequently, we have to create a second launch file for the second controller ( or to adjust the existing launch file). We have to be sure that the name of the node that will be created is different in both files . What is more, we have to use the "remap" tag http://wiki.ros.org/roslaunch/XML/remap inside the launch files. Please add the : <remap from="cmd_vel" to="robot0/cmd_vel"/> in each launch file,where the value of the robot0 has to be different in each file. Please see below :

Having do the appropriate changes we are ready to controll each controller seperatelly.
Launch two nodes for the two controllers, executing the roslaunch command for each launch file:
roslaunch roboteq_motor_controller_driver driver.launch
roslaunch roboteq_motor_controller_driver driver.launch
roslaunch roboteq_motor_controller_driver driver2.launch
If we execute the below command :
rosnode list
we can see that two nodes corresponding to the two controllers have been created successfully

As we had mentioned before, we can use the teleop_twist_keyboard package so that to move the motor that is connected to Roboteq's controller. But in case that we have more than one controller, we have to remap its cmd_vel topic to the controller that we want to control. Therefore, for the first and second controllers we do remap to robot0 and robot2 respectivelly. See below :
rosrun teleop_twist_keyboard teleop_twist_keyboard.py cmd_vel:=robot0/cmd_vel
rosrun teleop_twist_keyboard teleop_twist_keyboard.py cmd_vel:=robot2/cmd_vel